
Goal Zero 10 Amp Solar Charge Controller with Battery Terminal Connections for Boulder Solar Panels
(2 reviews)
Price: $146.77
In Stock
Goal Zero 10 Amp Solar Charge Controller with Battery Terminal Connections for Boulder Solar Panels
Item # GZ79YR
Our Price: $146.77
In Stock


 lithium (lifepo4) gz79yr")
 lithium (lifepo4)")
 lithium (lifepo4) gz79yr")


 lithium (lifepo4) goal zero 10 amp solar charge controller with battery terminal connections for boulder panels")

Need help with installation?
Locate installers near me- All Info
- Reviews (2)
- Q & A (0)
- Videos (1)
- Photos
Goal Zero Solar Charge Controllers - GZ79YR
- PWM
- 10 Amp
- Goal Zero
- Gel
- AGM
- Flooded
- Calcium
- Lithium-Titanate (LTO)
- Lithium (liFePO4)
- Digital Display
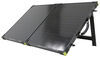
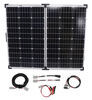
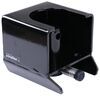
Charge a 12V battery with your Goal Zero Boulder solar panel. 10-Amp solar controller regulates power output for a consistent charge and prevents overcharging. Ring terminals for secure connections. Works with Boulder 50 and Boulder 100 solar panels.
Features:
- Solar charge controller kit lets you charge a 12V battery with your Goal Zero Boulder 50 or Boulder 100 solar panel
- 10-Amp PWM solar controller adjusts solar panel output for a quick, consistent charge
- Automatic multistage charging switches modes as the battery charges - helps extend battery life
- Safety features protect against overcharging, undercharging, reverse polarity, short circuit, and over voltage
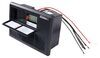
- Digital display monitors amperage, voltage, and battery capacity
- IP65 rated construction is weather resistant and dustproof
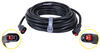
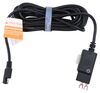
- Includes spade to 8mm cable to connect to Goal Zero solar panels
- Spade to SAE cable lets you connect solar charge controller to a SAE connection
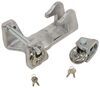
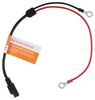
- SAE to ring terminal cable lets you connect your 12V battery to Goal Zero spade to SAE cable
- Ring terminals provide a secure connection
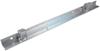
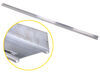
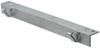
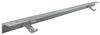
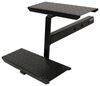
- Metal mounting bracket connects the solar charge controller to Boulder solar panel
Specs:
- Application: 12V battery systems
- Works with gel, AGM, calcium, flooded lead acid, LTO, and lithium iron phosphate batteries
- Maximum solar array current: 10 amps
- Normal input solar array voltage: 15 - 22V
- Maximum solar array voltage: 25V
- SAE cable polarity: silver pin positive, female plastic negative
- Operating temperature: -13 to 122 F
- IP rating: IP65
- Cable gauges:
- Spade to SAE: 12
- SAE to ring terminal: 12
- Cable lengths:
- Spade to 8mm: 3'
- Spade to SAE 15'
- SAE to ring terminal: 21"
- Charge controller weight: 1.1 lbs
- Charge controller dimensions: 3-7/8" long x 6-1/8" wide x 1" tall
- 1-Year warranty
98370 Spade to SAE Cable for Goal Zero 10 Amp and 20 Amp Solar Charge Controllers
98375 Goal Zero SAE to Ring Terminal Connector
96100 Goal Zero PWM Solar Charge Controller with 8mm Solar Connector - LCD Display - 10 Amp
98365 Goal Zero Solar Charge Controller Mounting Bracket for Boulder Solar Panels - Quantity 1


Video of Goal Zero 10 Amp Solar Charge Controller with Battery Terminal Connections for Boulder Solar Panels

Videos are provided as a guide only. Refer to manufacturer installation instructions and specs for complete information.

Video Transcript for Review of Goal Zero Solar Charge Controllers - 10 Amp Ring Terminal Connections - GZ79YR
Hi there. I'm Michael with etrailer.com. Today, we're gonna take a quick look at this Goal Zero 10 amp solar charge controller kit. This is going to allow you to charge your 12 volt battery using your Goal Zero Boulder 50 or Boulder 100 solar panel. Those solar panels are sold separately, but you can find them here at etrailer.com using the part numbers that you see on the screen there. This will allow you to use those solar panels to then charge up your gel, AGM, calcium, flooded lead acid, lithium titanium oxide, or lithium iron phosphate batteries.
So, if you have any of those 12 volt batteries, you're wanting to use your Boulder solar panels, this is gonna be a great kit for you. This does have these ring terminals that will provide a nice, secure connection to your battery's terminals. This is gonna be more of a permanent installation. There's another kit that has alligator clamps if you're wanting a more temporary setup. But this is gonna be for those of you who are gonna wanna charge the same battery frequently.
These will stay mounted onto your battery. And then very easily plugs right into our 15 foot long 12 gauge Goal Zero spade to SAE cable here. So, this is gonna give us 15 feet to work with so that we can have our solar panel in the sun, getting all that sunshine. And then we can have our battery and vehicle, or whatever it is mounted in the shade where it's gonna be nice and cool for us. Our spade connector is going to connect to the bottom of our solar charge controller here.
So, there are indicators. It might be kind of hard to see. There's a positive and a negative right there on the housing so it's easy to keep track of. And then on our solar controller, you can see we've got battery emblem there, and then positive and negative right underneath it. So, that helps us to know how to get that plugged in.
So, very easy to back those screws out a little bit, slide that spade connector in, and then tighten those screws down. We'll be connected. Then we're also going to have this three foot long spade to eight millimeter cable to connect to our Goal Zero solar panel. So, that solar panel is then going to send that electricity into our charge controller. Our charge controller is gonna send it to our battery. So, this is gonna act kind of like the brains of the operation. It's a 10 amp pulse width modulation solar controller that's going to adjust the solar panel's output for a quick but consistent charge of your battery. This does feature automatic multistage charging, so it's gonna switch modes as the battery charges to make sure that it's not going to overcharge and potentially damage the battery. So, it's gonna help extend the battery's life. It's got several different safety features to protect against overcharging, undercharging, reverse polarity, short circuiting, and over voltage. And you can see it does have a nice, digital display that's gonna monitor the amperage, voltage, and battery capacity. Make that very clear for you so you can keep an eye eye on what's going on. This does have a maximum solar array current of 10 amps. A normal input solar array voltage between 15 and 22 volts. Maximum solar array voltage of 25 volts. And it will operate in temperatures ranging from -13 degrees Fahrenheit up to 122 degrees Fahrenheit. So, it's gonna hold up really well for you in all sorts of weather environments or temperature environments. As far as our dimensions go, we're looking at right about six inches inches in width by approximately four inches tall, and only about an inch thick. It weighs about one pound, just slightly over one pound. And this does include the metal mounting bracket that's going to allow you to connect your solar charge controller to your Boulder solar panel. So, that's gonna give you a nice mounting location there. This is IP65 rated, so it is going to be weather resistant and dust proof. It's gonna hold up really well for you and allow you to control that power that's flowing in from your solar panel. So, if you do have the Goal Zero Boulder 50 or Boulder 100 solar panel, you're wanting to charge your 12 volt battery, this is gonna be the kit for you. We do have other kits available, like I said, that have the alligator clamp. Or we have a 20 amp charge controller if you have a larger solar panel, we have that available. So, make sure you're getting the right kit for your setup. But if you do have the 50 or 100 solar panel, this is gonna be a great kit to have you more permanently connected to your battery, make it very easy for you to get that battery charged. And that completes our look for today. Again, I'm Michael with etrailer.com. Thanks for watching..
Customer Satisfaction Score:
95% were satisfied with this product
5% of customers were not satisfied
Customer Reviews
Goal Zero 10 Amp Solar Charge Controller with Battery Terminal Connections for Boulder Solar Panels - GZ79YR
Average Customer Rating: 4.0 out of 5 stars (2 Customer Reviews)
Charge a 12V battery with your Goal Zero Boulder solar panel. 10-Amp solar controller regulates power output for a consistent charge and prevents overcharging. Ring terminals for secure connections. Works with Boulder 50 and Boulder 100 solar panels.by: David07/24/2022
Goal zero has a decent product, my issue with Goal Zero is you have to purchase everything separately. I feel they do this to hide the high cost of a complete system.
by: David 08/26/2022
2
2
See what our Experts say about this Goal Zero Solar Charge Controllers
- What Do I Need To Install Goal Zero Briefcase Solar Panel To My Battery BankYes, the Goal Zero Boulder 100 Briefcase Solar Panel - 100 Watts, part # 287-32408, will work with your motorhome with the addition of the Goal Zero 10 Amp Solar Charge Controller with Battery Terminal Connections for Boulder Solar Panels, part # GZ79YR. Your solar panel will not hook directly to your batteries. It will connect to the charge controller. Having a multi-meter, part # PT89ZR, handy will make connecting your solar panel and charge controller easier. I have included product...
view full answer...
Info for this part was:

Updated by:
Wilson B

Edited by:
Daron K

Written by:
Alex H

Installed by:
Michael B
At etrailer.com we provide the best information available about the products we sell. We take the quality of our information seriously so that you can get the right part the first time. Let us know if anything is missing or if you have any questions.
Thank you! Your comment has been submitted successfully. You should be able to view your question/comment here within a few days.
Error submitting comment. Please try again momentarily.